
Building a beautiful Power Apps mobile navigation menu - SVG’s (part 3)
Welcome to part 3! Today we will learn how to replace the out-of-the-box icons with custom SVG’s in our menu. The icons will change colour dynamically when we select the menu item, and I’ll also add a little tip on how to make the icon animated (WITHOUT using the timer control!). Don’t worry if you’ve never worked, or even heard of SVG’s, I am going to do this step by step with plenty of screenshots to make it as easy to understand as possible.
First of all - what are SVG’s and why should you use them?
Scalable Vector Graphics (SVG) is an XML-based vector image format for two-dimensional graphics with support for interactivity and animation. (ref. Wikipedia)
This effectively means, that regardless of how large you make your icon - 1px or 1,000,000px - the quality will not be affected. You would never be able to achieve that with a PNG/JPEG based icon downloaded from another website (such as Flaticon).
So, what are the advantages of SVG’s and why should you use them in Power Apps?
To extend the existing icon set in Canvas apps. All out-of-the-box icons are also SVG’s, however there is a limited number of them and sometimes this may not be sufficient.
SVG’s are XML-based which means they are extremely small in size, icons we are using today are 0.01kb. For comparison, a 50x50px icon from Flaticon in PNG/JPEG format will be around 100-200kb. If you use 10 icons, that’s 2mb already which is going to start affecting the loading time and general speed of your application.
If you use JPEG/PNG based icons, you are also unable to dynamically change their colours. While this may not always be a requirement, for our menu we want the ability to highlight the active screen icon, and make the remaining icons gray.
Animation - with out of the box icons or JPEG/PNG icons, you have to use timer controls and formulas. This means that you are quickly adding the total number of controls in your screen (don’t forget that the optimal number of all your controls is around 500) and while it won’t affect your app most of the time, timer controls can sometimes break/work inefficiently if running in the invisible mode. With our SVG, we can not only animate with just a simple code snippet, we can actually animate every single part of our SVG too! 🤩
Before we start, I’d like to give a shoutout to my fellow SVG addict, Robin (Twitter: @power_r2). He does some AMAZING stuff with SVG’s, and I’d totally recommend checking out his YouTube channel.
So…. let’s start the work!
Firstly, we need to find some SVG’s to use. Two of my favourite websites to get them is from the Bootstrap framework website and SVG Repo.
For today’s demo, we are going to use the following three icons:
Home screen - House fill · Bootstrap Icons (getbootstrap.com)
Settings screen - Gear fill · Bootstrap Icons (getbootstrap.com)
Profile screen - Person fill · Bootstrap Icons (getbootstrap.com)
Firstly, navigate to the first link and download the SVG to your computer.

SVGs are built using vectors and are written in XML code. To open it in an editable format, you will need to open it with a notepad or VS Code. As not everyone will have VS Code installed on their PC, for today’s demo we will just use the notepad. Please choose Open with, and then select notepad. I’d also suggest that you set notepad as the default app for SVGs so that you don’t have to manually choose it each time.
We are then greeted with the SVG code. These are all the building blocks that make up our icon. It can be quite scary at first when you’re not a developer but today I’ll show you how to easily customise them without actually understanding the underlying code.

Firstly, we need to replace all of the double quotes with a single quote. To do this, press CTRL + H on your keyboard (or click Edit, and then Replace) and then type “ in the first line, and ‘ in the second line, then click ‘Replace all’.

Perfect! To add an SVG to Power Apps, we have to use the mime type (“data:image/svg+xml;utf8,”) and then a PowerFx function EncodeUrl at the beginning of our code. Here’s the snippet:
"data:image/svg+xml;utf8, "&EncodeUrl("
  <-- OUR SVG CODE GOES HERE -->
  <-- DON'T FORGET TO ADD DOUBLE QUOTES AND CLOSING BRACKET AT THE END OF THE CODE --> ")
Our ready-to-use house icon code should look like this:

Let’s give it a try in our app! You’ll need to add an Image control to your app, and in the Image property, please paste your code snippet. You should get this result:

You can see that our SVG has two lines starting with <path>. These are the building blocks of our SVG. If you want to change the colour of individual blocks, you can add a ‘fill’ property to each one of them. Here’s an example:

Voilla! This is how you colour individual blocks. If you want to assign the same colour for all of the building blocks of the SVG, you can declare the fill property in the first line where we specify the namespace etc. For today’s menu, we will use '#0583D2’ as our primary colour.

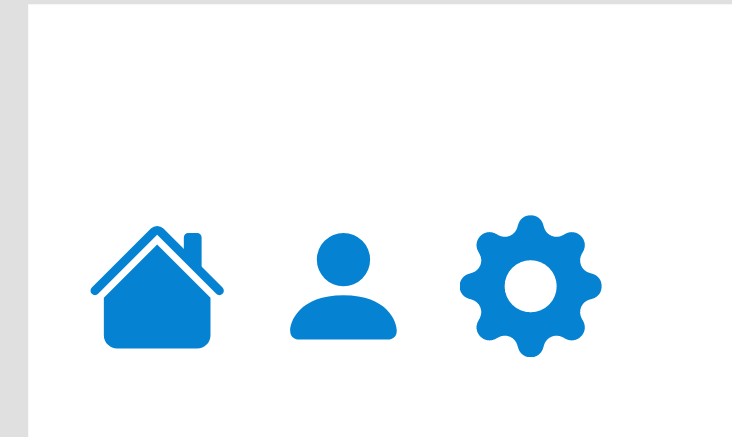
Perfect! Before we proceed any further, please do it with the other two icons that we downloaded before - this will get you a bit more used to the code itself.
Here are code snippets for the other two icons - hope you got both of them right! 😊
Profile icon:
"data:image/svg+xml;utf8, "&EncodeUrl("
<svg xmlns='http://www.w3.org/2000/svg' width='16' height='16' fill='#0583D2' class='bi bi-person-fill' viewBox='0 0 16 16'>
  <path d='M3 14s-1 0-1-1 1-4 6-4 6 3 6 4-1 1-1 1H3zm5-6a3 3 0 1 0 0-6 3 3 0 0 0 0 6z'/>
</svg>")
Settings gear icon:
"data:image/svg+xml;utf8, "&EncodeUrl("
<svg xmlns='http://www.w3.org/2000/svg' width='16' height='16' fill='#0583D2' class='bi bi-gear-fill' viewBox='0 0 16 16'>
  <path d='M9.405 1.05c-.413-1.4-2.397-1.4-2.81 0l-.1.34a1.464 1.464 0 0 1-2.105.872l-.31-.17c-1.283-.698-2.686.705-1.987 1.987l.169.311c.446.82.023 1.841-.872 2.105l-.34.1c-1.4.413-1.4 2.397 0 2.81l.34.1a1.464 1.464 0 0 1 .872 2.105l-.17.31c-.698 1.283.705 2.686 1.987 1.987l.311-.169a1.464 1.464 0 0 1 2.105.872l.1.34c.413 1.4 2.397 1.4 2.81 0l.1-.34a1.464 1.464 0 0 1 2.105-.872l.31.17c1.283.698 2.686-.705 1.987-1.987l-.169-.311a1.464 1.464 0 0 1 .872-2.105l.34-.1c1.4-.413 1.4-2.397 0-2.81l-.34-.1a1.464 1.464 0 0 1-.872-2.105l.17-.31c.698-1.283-.705-2.686-1.987-1.987l-.311.169a1.464 1.464 0 0 1-2.105-.872l-.1-.34zM8 10.93a2.929 2.929 0 1 1 0-5.86 2.929 2.929 0 0 1 0 5.858z'/>
</svg> ")
Your screen should now look like this:
There is some additional code that we will need to add to the SVG’s after we’ve added them to the gallery so please stay tuned!
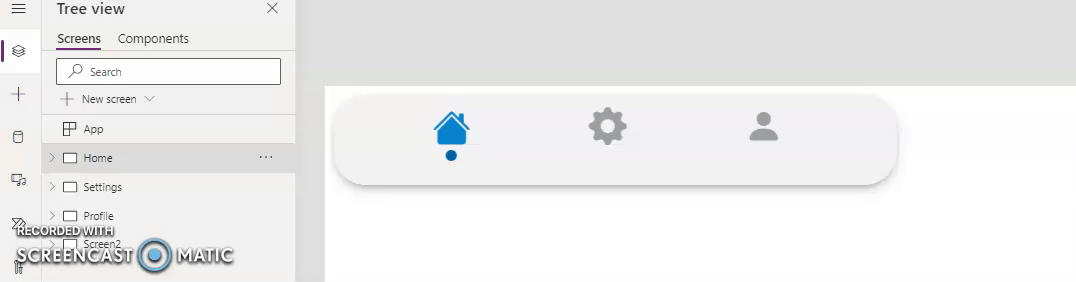
The first thing we will need to do is remove the icons we previously added to the gallery. For the time being though, let’s just keep it in there and change the visible property of the Icon to false.

It’s now time to do the hard work! Let’s start by adding an image control to our menu.

If we had a static menu with no colour changes, we would be able to just add another column to our MenuItems property and add the SVG code to each line. However, as we want the menu icons to change colours based on the active screen (if the menu item is the active screen, we want it to be bright blue, otherwise we want it to be gray), we will need to use a Switch() function with an additional If() statement in each of the SVG’s. It sounds more complicated than it is, I promise!
We will start building our code by adding "data:image/svg+xml;utf8, " & EncodeUrl(" which will then be followed by the Switch function. Now, to reference anything outside of the SVG code (a function, control etc.) we need to add “& at the beginning and end of that code.
"data:image/svg+xml;utf8, " & EncodeUrl( " <— this is our initial formula we used earlier —>
" & <— this is the additional “& —>
Switch( <— our function —>
ThisItem.MenuItem , <— we will switch the icon based on the name of our menu —>
“Home”, <— the first menu item in our MenuItems array —>
<svg xmlns='http://www.w3.org/2000/svg' width='16' height='16' fill='#0583D2' class='bi bi-house-fill' viewBox='0 0 16 16'>
<path fill-rule='evenodd' d='m8 3.293 6 6V13.5a1.5 1.5 0 0 1-1.5 1.5h-9A1.5 1.5 0 0 1 2 13.5V9.293l6-6zm5-.793V6l-2-2V2.5a.5.5 0 0 1 .5-.5h1a.5.5 0 0 1 .5.5z'/>
<path fill-rule='evenodd' d='M7.293 1.5a1 1 0 0 1 1.414 0l6.647 6.646a.5.5 0 0 1-.708.708L8 2.207 1.354 8.854a.5.5 0 1 1-.708-.708L7.293 1.5z'/>
</svg> <— our SVG code. Please do not include the last “) as we will be adding this at the very end of this function —>
“Settings”,
<svg xmlns='http://www.w3.org/2000/svg' width='16' height='16' fill='#0583D2' class='bi bi-gear-fill' viewBox='0 0 16 16'>
<path d='M9.405 1.05c-.413-1.4-2.397-1.4-2.81 0l-.1.34a1.464 1.464 0 0 1-2.105.872l-.31-.17c-1.283-.698-2.686.705-1.987 1.987l.169.311c.446.82.023 1.841-.872 2.105l-.34.1c-1.4.413-1.4 2.397 0 2.81l.34.1a1.464 1.464 0 0 1 .872 2.105l-.17.31c-.698 1.283.705 2.686 1.987 1.987l.311-.169a1.464 1.464 0 0 1 2.105.872l.1.34c.413 1.4 2.397 1.4 2.81 0l.1-.34a1.464 1.464 0 0 1 2.105-.872l.31.17c1.283.698 2.686-.705 1.987-1.987l-.169-.311a1.464 1.464 0 0 1 .872-2.105l.34-.1c1.4-.413 1.4-2.397 0-2.81l-.34-.1a1.464 1.464 0 0 1-.872-2.105l.17-.31c.698-1.283-.705-2.686-1.987-1.987l-.311.169a1.464 1.464 0 0 1-2.105-.872l-.1-.34zM8 10.93a2.929 2.929 0 1 1 0-5.86 2.929 2.929 0 0 1 0 5.858z'/>
</svg>,
“Profile”,
svg xmlns='http://www.w3.org/2000/svg' width='16' height='16' fill='#0583D2' class='bi bi-person-fill' viewBox='0 0 16 16'>
<path d='M3 14s-1 0-1-1 1-4 6-4 6 3 6 4-1 1-1 1H3zm5-6a3 3 0 1 0 0-6 3 3 0 0 0 0 6z'/>
</svg> “)
"data:image/svg+xml;utf8, " & EncodeUrl( " <— this is our initial formula we used earlier —>
" & <— this is the additional “& —>
Switch( <— our function —>
ThisItem.ScreenName, <— we will switch the icon based on the name of our menu —>
"Home", <— the first menu item in our MenuItems array —>
"<svg xmlns='http://www.w3.org/2000/svg' width='16' height='16' fill='#0583D2' class='bi bi-house-fill' viewBox='0 0 16 16'>
<path fill-rule='evenodd' d='m8 3.293 6 6V13.5a1.5 1.5 0 0 1-1.5 1.5h-9A1.5 1.5 0 0 1 2 13.5V9.293l6-6zm5-.793V6l-2-2V2.5a.5.5 0 0 1 .5-.5h1a.5.5 0 0 1 .5.5z'/>
<path fill-rule='evenodd' d='M7.293 1.5a1 1 0 0 1 1.414 0l6.647 6.646a.5.5 0 0 1-.708.708L8 2.207 1.354 8.854a.5.5 0 1 1-.708-.708L7.293 1.5z'/>
</svg> ", <— our SVG code. Please do not include the last “) as we will be adding this at the very end of this function —>
"Settings",<— the second menu item in our MenuItems array —>
"<svg xmlns='http://www.w3.org/2000/svg' width='16' height='16' fill='#0583D2' class='bi bi-gear-fill' viewBox='0 0 16 16'>
<path d='M9.405 1.05c-.413-1.4-2.397-1.4-2.81 0l-.1.34a1.464 1.464 0 0 1-2.105.872l-.31-.17c-1.283-.698-2.686.705-1.987 1.987l.169.311c.446.82.023 1.841-.872 2.105l-.34.1c-1.4.413-1.4 2.397 0 2.81l.34.1a1.464 1.464 0 0 1 .872 2.105l-.17.31c-.698 1.283.705 2.686 1.987 1.987l.311-.169a1.464 1.464 0 0 1 2.105.872l.1.34c.413 1.4 2.397 1.4 2.81 0l.1-.34a1.464 1.464 0 0 1 2.105-.872l.31.17c1.283.698 2.686-.705 1.987-1.987l-.169-.311a1.464 1.464 0 0 1 .872-2.105l.34-.1c1.4-.413 1.4-2.397 0-2.81l-.34-.1a1.464 1.464 0 0 1-.872-2.105l.17-.31c.698-1.283-.705-2.686-1.987-1.987l-.311.169a1.464 1.464 0 0 1-2.105-.872l-.1-.34zM8 10.93a2.929 2.929 0 1 1 0-5.86 2.929 2.929 0 0 1 0 5.858z'/>
</svg>", <— our SVG code. Please do not include the last “) as we will be adding this at the very end of this function —>
"Profile", <— the thirdmenu item in our MenuItems array —>
"<svg xmlns='http://www.w3.org/2000/svg' width='16' height='16' fill='#0583D2' class='bi bi-person-fill' viewBox='0 0 16 16'>
<path d='M3 14s-1 0-1-1 1-4 6-4 6 3 6 4-1 1-1 1H3zm5-6a3 3 0 1 0 0-6 3 3 0 0 0 0 6z'/>
</svg> " <— our SVG code. Please do not include the last “) as we will be adding this at the very end of this function —>
) <— closing the Switch function—>
&" <— closing the referencing part —>
") <— closing the EncodeUrl function —>
This is the complete snippet:
"data:image/svg+xml;utf8, " & EncodeUrl( "

" &
Switch(
       ThisItem.ScreenName,
"Home",

"<svg xmlns='http://www.w3.org/2000/svg' width='16' height='16' fill='#0583D2' class='bi bi-house-fill' viewBox='0 0 16 16'>

  <path  fill-rule='evenodd' d='m8 3.293 6 6V13.5a1.5 1.5 0 0 1-1.5 1.5h-9A1.5 1.5 0 0 1 2 13.5V9.293l6-6zm5-.793V6l-2-2V2.5a.5.5 0 0 1 .5-.5h1a.5.5 0 0 1 .5.5z'/>

  <path  fill-rule='evenodd' d='M7.293 1.5a1 1 0 0 1 1.414 0l6.647 6.646a.5.5 0 0 1-.708.708L8 2.207 1.354 8.854a.5.5 0 1 1-.708-.708L7.293 1.5z'/>

</svg>  ",

"Settings",

"<svg xmlns='http://www.w3.org/2000/svg' width='16' height='16' fill='#0583D2' class='bi bi-gear-fill' viewBox='0 0 16 16'>

  <path d='M9.405 1.05c-.413-1.4-2.397-1.4-2.81 0l-.1.34a1.464 1.464 0 0 1-2.105.872l-.31-.17c-1.283-.698-2.686.705-1.987 1.987l.169.311c.446.82.023 1.841-.872 2.105l-.34.1c-1.4.413-1.4 2.397 0 2.81l.34.1a1.464 1.464 0 0 1 .872 2.105l-.17.31c-.698 1.283.705 2.686 1.987 1.987l.311-.169a1.464 1.464 0 0 1 2.105.872l.1.34c.413 1.4 2.397 1.4 2.81 0l.1-.34a1.464 1.464 0 0 1 2.105-.872l.31.17c1.283.698 2.686-.705 1.987-1.987l-.169-.311a1.464 1.464 0 0 1 .872-2.105l.34-.1c1.4-.413 1.4-2.397 0-2.81l-.34-.1a1.464 1.464 0 0 1-.872-2.105l.17-.31c.698-1.283-.705-2.686-1.987-1.987l-.311.169a1.464 1.464 0 0 1-2.105-.872l-.1-.34zM8 10.93a2.929 2.929 0 1 1 0-5.86 2.929 2.929 0 0 1 0 5.858z'/>

</svg>",

"Profile",

"<svg xmlns='http://www.w3.org/2000/svg' width='16' height='16' fill='#0583D2' class='bi bi-person-fill' viewBox='0 0 16 16'>

  <path d='M3 14s-1 0-1-1 1-4 6-4 6 3 6 4-1 1-1 1H3zm5-6a3 3 0 1 0 0-6 3 3 0 0 0 0 6z'/>

</svg> "
) &"

")
Your menu should now look like this:
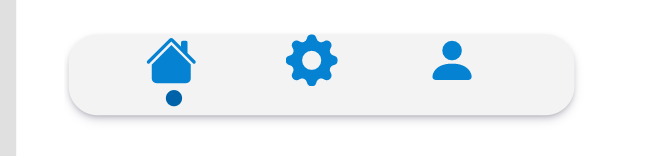
We are nearly there! Feel free to resize the icons as you wish too.
The last part of the puzzle is making the inactive icons gray. To do this, we will need to go back to our code (I know, I know!). All we will need to do is add an If() statement - if the name of the screen matches the active screen, we want it to be bright blue, otherwise we will make it dark gray.
All we need to do, is change the fill property of each SVG (where we declared the bright blue colour or any other colour you may have used), and construct the following formula:
If( ThisItem.ScreenName = App.ActiveScreen.Name, “#0583D2", "#333333")
Now, as we are referring to something outside of the code (our screen name and menu item name), we will have to add “& and then &” at the beginning and end of our code. Our fill property should look like this:
fill=' "& If(ThisItem.ScreenName = App.ActiveScreen.Name, "#0583D2", "#9f9f9f") &" '
This is how it should look in our code:

We need to change the fill property for all three items in our Image control. Here’s the completed snippet:
"data:image/svg+xml;utf8, " & EncodeUrl( "
" &
Switch(
ThisItem.ScreenName,
"Home",
"<svg xmlns='http://www.w3.org/2000/svg' width='16' height='16' fill=' "& If(ThisItem.ScreenName = App.ActiveScreen.Name, "#0583D2", "#9f9f9f") &" ' class='bi bi-house-fill' viewBox='0 0 16 16'>
<path fill-rule='evenodd' d='m8 3.293 6 6V13.5a1.5 1.5 0 0 1-1.5 1.5h-9A1.5 1.5 0 0 1 2 13.5V9.293l6-6zm5-.793V6l-2-2V2.5a.5.5 0 0 1 .5-.5h1a.5.5 0 0 1 .5.5z'/>
<path fill-rule='evenodd' d='M7.293 1.5a1 1 0 0 1 1.414 0l6.647 6.646a.5.5 0 0 1-.708.708L8 2.207 1.354 8.854a.5.5 0 1 1-.708-.708L7.293 1.5z'/>
</svg> ",
"Settings",
"<svg xmlns='http://www.w3.org/2000/svg' width='16' height='16' fill=' "& If(ThisItem.ScreenName = App.ActiveScreen.Name, "#0583D2", "#9f9f9f") &" ' class='bi bi-gear-fill' viewBox='0 0 16 16'>
<path d='M9.405 1.05c-.413-1.4-2.397-1.4-2.81 0l-.1.34a1.464 1.464 0 0 1-2.105.872l-.31-.17c-1.283-.698-2.686.705-1.987 1.987l.169.311c.446.82.023 1.841-.872 2.105l-.34.1c-1.4.413-1.4 2.397 0 2.81l.34.1a1.464 1.464 0 0 1 .872 2.105l-.17.31c-.698 1.283.705 2.686 1.987 1.987l.311-.169a1.464 1.464 0 0 1 2.105.872l.1.34c.413 1.4 2.397 1.4 2.81 0l.1-.34a1.464 1.464 0 0 1 2.105-.872l.31.17c1.283.698 2.686-.705 1.987-1.987l-.169-.311a1.464 1.464 0 0 1 .872-2.105l.34-.1c1.4-.413 1.4-2.397 0-2.81l-.34-.1a1.464 1.464 0 0 1-.872-2.105l.17-.31c.698-1.283-.705-2.686-1.987-1.987l-.311.169a1.464 1.464 0 0 1-2.105-.872l-.1-.34zM8 10.93a2.929 2.929 0 1 1 0-5.86 2.929 2.929 0 0 1 0 5.858z'/>
</svg>",
"Profile",
"<svg xmlns='http://www.w3.org/2000/svg' width='16' height='16' fill=' "& If(ThisItem.ScreenName = App.ActiveScreen.Name, "#0583D2", "#9f9f9f") &" ' class='bi bi-person-fill' viewBox='0 0 16 16'>
<path d='M3 14s-1 0-1-1 1-4 6-4 6 3 6 4-1 1-1 1H3zm5-6a3 3 0 1 0 0-6 3 3 0 0 0 0 6z'/>
</svg> "
) &"
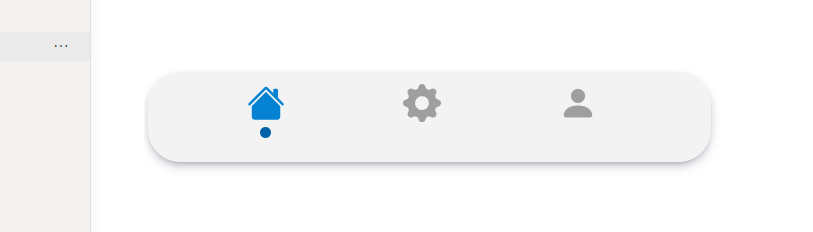
")And here’s what you’ve been waiting for……. the finished result 🤩 How slick does it look?!
One thing that’s slightly bugging me is the size of the button we added in our last blog. Let’s change that to fit the menu a bit better. Let’s change a couple of properties:
Height - from Gallery2_6.TemplateHeight to Gallery2_6.TemplateHeight - 30
Y - from 0 to 10
BorderRadius - from 0 to 35

Now, that’s more like it!
As promised, I’m also going to show you how to add a little bit of animation. The end result we want to achieve is the active icon to float from top to bottom subtly. We are going to do this by using code, specifically the <animateTransform> function. There is a lot to cover here so I will work on another blog series concentrating on SVG’s. In the meantime, let’s ‘cheat’ a little bit with a snippet I’ve already prepared.
<animateTransform attributeName='transform'
        type='translate'
        values='0 0;0 3;0 0 '
        dur='1s'
	repeatCount='indefinite' />
Now, if we add this to every menu item, ALL of them will be animated. So to achieve our end result of the active icon being animated, and the rest of them being static, we will need to do another If() statement (similar to the one we used with the colours). This code will sit after all of the <path> and <g> tags, but before the closing </svg> tag. As we are referencing controls outside of the code, we need to use “& again. Here’s the snippet for one of the SVGs:
<animateTransform attributeName='transform'
        type='translate'
        values='"& If(ThisItem.ScreenName = App.ActiveScreen.Name, "0 0;0 3;0 0","0 0;0 0;0 0") &" '
     dur='1s'
	repeatCount='indefinite' />
Here’s the complete snippet for the Image property:
"data:image/svg+xml;utf8, " & EncodeUrl( "

" &
Switch(
       ThisItem.ScreenName,
"Home",

"<svg xmlns='http://www.w3.org/2000/svg' width='16' height='16' fill=' "& If(ThisItem.ScreenName = App.ActiveScreen.Name, "#0583D2", "#9f9f9f") &" ' class='bi bi-house-fill' viewBox='0 0 16 16'>

  <path  fill-rule='evenodd' d='m8 3.293 6 6V13.5a1.5 1.5 0 0 1-1.5 1.5h-9A1.5 1.5 0 0 1 2 13.5V9.293l6-6zm5-.793V6l-2-2V2.5a.5.5 0 0 1 .5-.5h1a.5.5 0 0 1 .5.5z'/>

  <path  fill-rule='evenodd' d='M7.293 1.5a1 1 0 0 1 1.414 0l6.647 6.646a.5.5 0 0 1-.708.708L8 2.207 1.354 8.854a.5.5 0 1 1-.708-.708L7.293 1.5z'/>

  <animateTransform attributeName='transform'
        type='translate'
        values='"& If(ThisItem.ScreenName = App.ActiveScreen.Name, "0 0;0 3;0 0","0 0;0 0;0 0") &" '
     dur='1s'
	repeatCount='indefinite' />
</svg>  ",

"Settings",

"<svg xmlns='http://www.w3.org/2000/svg' width='16' height='16' fill=' "& If(ThisItem.ScreenName = App.ActiveScreen.Name, "#0583D2", "#9f9f9f") &" ' class='bi bi-gear-fill' viewBox='0 0 16 16'>

  <path d='M9.405 1.05c-.413-1.4-2.397-1.4-2.81 0l-.1.34a1.464 1.464 0 0 1-2.105.872l-.31-.17c-1.283-.698-2.686.705-1.987 1.987l.169.311c.446.82.023 1.841-.872 2.105l-.34.1c-1.4.413-1.4 2.397 0 2.81l.34.1a1.464 1.464 0 0 1 .872 2.105l-.17.31c-.698 1.283.705 2.686 1.987 1.987l.311-.169a1.464 1.464 0 0 1 2.105.872l.1.34c.413 1.4 2.397 1.4 2.81 0l.1-.34a1.464 1.464 0 0 1 2.105-.872l.31.17c1.283.698 2.686-.705 1.987-1.987l-.169-.311a1.464 1.464 0 0 1 .872-2.105l.34-.1c1.4-.413 1.4-2.397 0-2.81l-.34-.1a1.464 1.464 0 0 1-.872-2.105l.17-.31c.698-1.283-.705-2.686-1.987-1.987l-.311.169a1.464 1.464 0 0 1-2.105-.872l-.1-.34zM8 10.93a2.929 2.929 0 1 1 0-5.86 2.929 2.929 0 0 1 0 5.858z'/>
 <animateTransform attributeName='transform'
        type='translate'
        values='"& If(ThisItem.ScreenName = App.ActiveScreen.Name, "0 0;0 3;0 0","0 0;0 0;0 0") &" '
     dur='1s'
	repeatCount='indefinite' />
</svg>",

"Profile",

"<svg xmlns='http://www.w3.org/2000/svg' width='16' height='16' fill=' "& If(ThisItem.ScreenName = App.ActiveScreen.Name, "#0583D2", "#9f9f9f") &" ' class='bi bi-person-fill' viewBox='0 0 16 16'>

  <path d='M3 14s-1 0-1-1 1-4 6-4 6 3 6 4-1 1-1 1H3zm5-6a3 3 0 1 0 0-6 3 3 0 0 0 0 6z'/>
 <animateTransform attributeName='transform'
        type='translate'
        values='"& If(ThisItem.ScreenName = App.ActiveScreen.Name, "0 0;0 3;0 0","0 0;0 0;0 0") &" '
     dur='1s'
	repeatCount='indefinite' />
</svg> "
) &"

")
Now just copy and paste this menu onto the other two screens we have built previously and you’re done. Here’s the FINAL RESULT 🤩

How cool does it look?! I absolutely love using this trick in my apps.
I hope you enjoyed part 3 of this series and have learned something new. I have tried to explain this as simply as possible and I hope it all makes sense - if you have any questions at all, please feel free to reach out to me as always and I’ll be more than happy to help.
Also don’t forget to subscribe if you’d like to get a notification when part 4 goes live! 😊